Tuesday, October 12, 2010

Purple Dessert Table

For my little one's third birthday party. I will not attempt this again while pregnant =) But it was sure fun to set up!


Purple homemade marshmallows....
Blackberry vanilla swirl cake with blackberry cream cheese frosting....
Blackberry vanilla cupcakes......

Purple candied apples.....

Dahlia gift bags.....
And five little girls. I love this picture for some reason. Next year maybe I should try and do a little bit more 'age-appropriate' party. We'll see. =)

Wednesday, September 8, 2010

Patterned Paper Pumpkins

I found THIS tutorial for these cute little paper pumpkins HERE. They were easy to make and customize to your personal preference. Aren't they cute?!


They are the perfect little fall touch to replace the white wicker balls I had in the metal basket before. I LOVE AUTUMN!!!!

Coffee Filter Wreath


I wanted a wreath to go over the mirror by our staircase and thought that this would be perfect. It was really easy to make(and cheap!), however a little time consuming.
All I did was take brown coffee filters (about $1.50 per package - I used 1 1/2 packages) and color the top of the filters with a black sharpie. Then I took each filter and scrunched it up from the middle, twisting and folding the bottom point. Then I simply glued each filter onto a foam wreath, placing them close together until the entire wreath was filled.
You would be AMAZED to look at this in real life and think that it was just a bunch of coffee filters. I LOVE it!

Friday, August 27, 2010

Corn Husk Wreath

I'm starting to get a little antsy for Fall to get here. And here in Vegas I know there will be no cool, crisp air and colorful falling leaves. So I've been searching blog after blog for cute decorating ideas. I came across this tutorial on how to make a corn husk wreath and had to have one for myself.
This tutorial used unrolled rafia ribbon, but I just used corn husks instead (found in the hispanic section of the grocery store). I cut the husks into strips about 4" long and 1" wide, folded in half, glued the folds together, and then glued the little folded halves onto a straw wreath base.
It was super easy!
Here it is on my front door:

And on my kitchen mirror(not centered, because I'm not keeping it there!):

I think I'm going to make a wreath with coffee filters next! I'm obsessed!

Saturday, July 17, 2010

Furniture re-do

I SO wish I had taken a before picture of this mirror. I found it at DI for about $25 and it is really well made. Before it was painted, it was a dark wood. I wanted something for our bedroom that was unique, so my dear husband painted it turquoise for me and then I antiqued it with a little black glaze. I got the idea from a very very awesome blog called all things thrifty. Check it out and get some great ideas of your own! Furniture re-purposing is easy!

A little decorating fun.....

I needed something to hang above our bed, so I made these canvas paintings with three different stencils. You can't see it from here, but there are streaks of blue showing through the white paint. It helps to subtly tie it in with the blue in the room.

Thursday, March 11, 2010

It must be my lucky week!!!

I have been so blessed as to be featured again, this time by Kelsey at Polished Productions!
Check out her blog to read about more about my store and see her own crafty creations!
Thank you, Kelsey! You are appreciated!

Wednesday, March 10, 2010

Now introducing....


Frayed and Fancy Ribbon Belts!


I can't wait to make more of these in other color combinations! They really add a lot to an outfit!
Head on over to my shop to see this and other similar items.


Monday, March 8, 2010

First Feature!

Stephanie over at Yeah, I'm Groovy has so kindly featured my Etsy shop.
Click HERE to see her post and read about a few other spiffy shops on Etsy.
She also has her own store full of vintage finds and handmade items.
Thanks, Stephanie!

My little muse

The best inspiration for creating childrens accessories is a beautiful little child herself. How lucky am I to have this little piece of heaven to inspire me and create for?!

Terribly lucky.

Sunday, March 7, 2010

For my beautiful bridesmaids....

Magnolia hair pins made of cream chiffon and bubble organza.

Saturday, February 27, 2010

Give Away at Made By Lex!

Click here to enter and see these beautiful pieces by Coco Bijou!

Friday, February 26, 2010

ETSY STORE ANNOUNCEMENT!

Due to lack of computer literacy, it's taken me awhile to get to, but my Etsy store is finally open!!! Click on the link at the right hand corner of this blog, or click HERE to see what I have available right now. If you don't see what you are looking for, I am always willing to do special orders! Thank you everyone for your support!

Just for fun!

These all sold before I could post them, but I thought that I'd put the pictures up anyway. I'll have to make some more like them soon.
Pretty pink and white crepe flowers


Blue damask frayed flower with a rhinestone, white flower with silver pearls

Cream bubble organza and white organza flowers with bead clusters

Thursday, February 25, 2010

Beaded Chiffon Flower Shirt


I saw this cardigan at Old Navy yesterday and thought that the flowers would look so cute on a little girls shirt...

I recently bought this shirt(at Old Navy, of course) for $5. To be honest, plain shirts just aren't my thing. I find them a bit dull. So it was the perfect shirt to spruce up!

I made a few chiffon flowers and and attached them to the shirt by sewing little beads in middle of each flower.

I'm really happy with the way it turned out! And hey, it only cost $6 to make!

Wednesday, February 24, 2010

Lemon Meringue Cupcakes


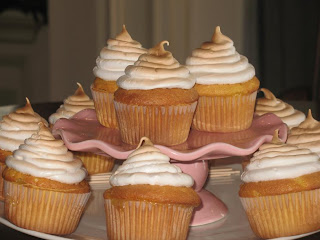
I made these cute little cupcakes for Valentines Day last week and had a large amount of lemon curd leftover...so I made a few more today to share with all of you on the blog. These little lemon cupcakes are filled with a lemon curd to give it that really "lemon meringue pie" sort of taste, along with a swiss meringue piped on the top and toasted.


I found Meyer lemons at the grocery store and was so excited! Finding little treats like that is a rare occurence in this town. Click here to learn more about Meyer Lemons... they are just lovely.

If you would like to make these cupcakes, simply find a lemon cake recipe that you like(or use a boxed mix) and bake in cupcake wrappers. When they have cooled down, cut the tops off, fill with a little bit of lemon curd. Make a Swiss Meringue, pipe on top of the cupcakes, and toast underneath your oven broiler until lightly browned (it only takes a 30 seconds or so, so watch them closely!!)
Here are my recipes for a lemon curd and Swiss Meringue:

Lemon Curd:
2 1/3 cups sugar
4 t. cornstarch
1 cup lemon juice
4 large Eggs
4 large Egg Yolks
¾ cup (1 ½ sticks) butter, cut into ½ inch cubes

For Curd:

Mix together sugar and cornstarch in a heavy large saucepan. Slowly add the key lime juice, whisking until all cornstarch is dissolved. Whisk in eggs and yolks. Add butter. Stir over medium heat until curd boils and thickens, about 12 minutes. Transfer to a medium bowl. Chill until cold, at least 6 hours or overnight.
*Press plastic wrap onto the surface of the curd to prevent crust from forming and keep chilled.

Swiss Merinque:
2 large egg white
1/2 cup of sugar
1/4 tsp. cream of tartar
1/2 tsp. vanilla extract

For the meringue:Put the sugar, cream of tartar, and egg whites into the bowl of an electric mixer. Set the bowl over a pot of simmering water (the bowl should not be touching the water) and allow the sugar to melt into the eggs. Once warmed, add the vanilla and beat the mixture until stiff peaks form, about 3 - 5 minutes, set aside.


A few tips~

* Lemon curd can be made up to a week in advance.
* Try using other citrus juices to make curd with, such as key limes or meyer lemons.
* You can use a creme brulee torch to toast your meringue, but I think it is a little too time consuming and prefer the broiler method.
* Keep these cupcakes in the fridge, I think they taste even better cold!

Enjoy!

Tuesday, February 23, 2010

Emmaline Headband


My first headband is sold to a cute little girl named Emmaline. Little sisters and their friends make excellent clients =) I LOVE the green damask print on the large flower. It sort of reminds me of the curtains that Maria used to make the Von trapp children playclothes.....

Stain-coverage discovered!

What do you do with a childs shirt that has been stained multiple times and been placed in the rag-pile? Throw it out? I think not!
If you have a few pretty scraps of material laying around and a few hours you can do THIS!
I used strips of dark gray crepe and light gray chiffon to sew little ruffles over the stained area.
With the scraps left over from the scraps, I made this matching hair clip. Matchy-matchy, but cute!

A few things I learned from this project:

1. Fray Check is your friend.
2. USE Fray Check.
3. Use Fray Check on the material BEFORE you sew it into little ruffles. It sure is a lot easier to apply it to flat material.
4. A sewing machine would make this project a LOT faster. I think I logged about 3 hours on this project by hand-stitching it.
5. I need to buy a sewing machine. And learn how to use it.

Look HERE for more idea's on re-fashioning old clothing. This woman is brilliant and inspired me to try my hand at it.